"Why reinvent the wheel when platforms like Medium exist?" - hackerNewsCommenter
"This could easily be an Express server serving static HTML." - anonymousRedditUser
This is the general sentiment from engineers when they see another custom blog of any complexity. It holds a lot of truth considering the ease of spinning up an Express server or making a Medium account. So, this project needed to be simple and intentional in order to justify its existence.
The Goal
Maximize: user experience and developer experience
Minimize: time and effort
For UX, I'm concerned with how quickly the client can render the first bit of content to the DOM and the amount of JavaScript required client-side to fully render the page. For DX, the goal is to minimize the time and effort needed for both end-to-end development and for adding/updating blog posts.
What Tools and Why
Next.js
Let’s hear out the above concerns. Suppose I have an Express server running, and it is sending the rendered HTML of my blog posts to the client. I install tailwindcss to expedite the styling process, a markdown library to speed up writing the blog posts, and webpack to perform tree shaking and bundling. I still want “server-side rendering” (aka sending pre-rendered HTML to the client), so I ensure the translation from markdown to HTML is happening server-side.
So far, this app has:
- a backend
- styling libraries
- bundling
- server-side rendering
Effectively, I recreated the basics of Next.js without getting any of its additional features. Yes, it is entirely feasible to build this blog using Express, a bundler, and a handful of third-party libraries. But, it is also true that frameworks are valuable, and using them without compromising user experience or developer workload is justified.
I’ll stick with npx create-next-app@latest.
Static Rendering vs Dynamic Rendering
In short, Static Rendering involves generating the content of a route at build time. Rather than having to generate the HTML for a blog post on each request (Dynamic Rendering), the server is able to send pre-rendered HTML immediately to the client. This strategy is particularly effective for routes with non-user-specific data that can be predetermined at the time of building (i.e. static blog posts like these).
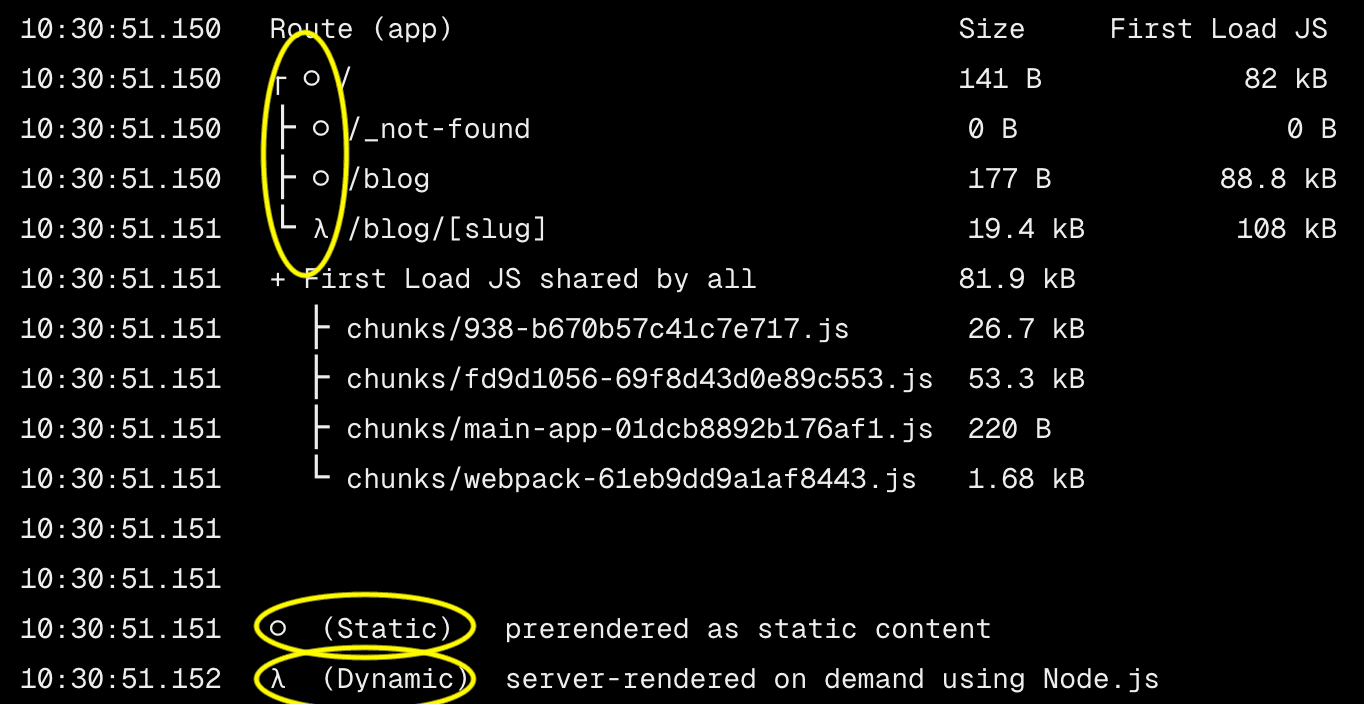
Next.js automatically determines the optimal rendering method for us at build time. Without explicit configuration, Next.js implements static rendering for the root route of the blog. But, since the routes for individual blog posts are dynamically generated using /blog/[slug], Next.js defaults these routes to be dynamically rendered.
We can check the build logs to see the rendering decisions made by Next.js:

Next.js's decision to dynamically render /blog/[slug] makes sense; the app has no way of knowing all of the possible routes it needs to statically generate at build-time.
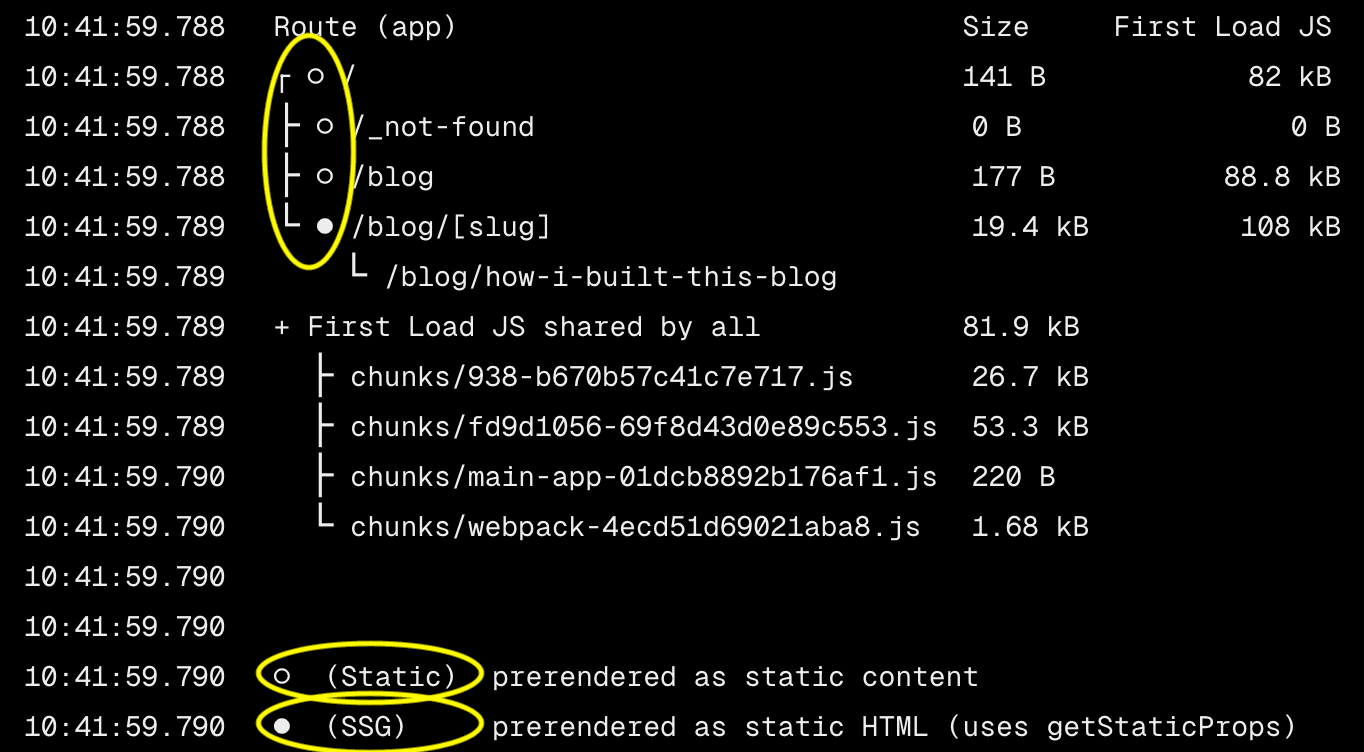
But, in fact, we do know the routes at build time: they are just the file names of my blog posts. Next.js provides a function, generateStaticParams, to pass these potential routes to our Page component for /blog/[slug]. This function can be used in combination with dynamic routes to statically generate at build time instead of on-demand at request time. With only the code below, all of the routes for individual blog posts will now be statically generated:
export async function generateStaticParams() {
  const posts = getAllBlogPosts();
  return posts.map((post) => ({
    slug: post.slug,
  }));
}
And, we can confirm that these route are being statically rendered by checking the new build logs:

In regards to UX, this strategy resulted in a remarkable 25% reduction in the time it took for content to begin rendering to the DOM, which is a testament to the effectiveness of static rendering with Next.js! 🍻
mdx.js
Writing the blog posts in markdown was about developer convenience. It's simply quicker to write markdown than HTML, and mdx.js enhances this by enabling JSX-embedded markdown. This means you can add custom React components inline with markdown. Explore their website and see the following tweet rendered from a custom Tweet component—a feature uniquely afforded by mdx and react-tweet.
Next.js 14 ◆ next dev --turbo ↳ 53% faster local server startup ↳ 94% faster code updates ◆ Server Actions (Stable) ◆ Partial Prerendering (Preview) ◆ New Next.js Learn Course ↳ App Router ↳ Authentication ↳ Postgres nextjs.org/14
"CMS"
All blog posts are stored in a /content directory on the server. When you visit this page /blog/how-i-built-this-blog, the page retrieves the how-i-built-this-blog.mdx file in the /content folder, parses the markdown to HTML, and sends the fully rendered page over to you. This approach comes with built-in version control via Git, and updating a blog post is as simple as editing a markdown file and pushing those changes. Love it. 🎯
Bringing It All Together
Our goals were:
- minimize the time it takes for the client to render the first bit of content to the DOM
With Next.js and static rendering, all of the blog posts are rendered on the server at build time, then served to the client efficiently. This ensures the shortest amount of time possible for the client to begin seeing data on their screen.
- minimize the amount of JavaScript needed client-side to fully render the page
Since every blog post is a React Server Component, the page is fully rendered on the server ensuring minimial processing on the client.
- minimize the time and effort for end-to-end development
With npx create-next-app@latest, development is focused on the blog landing page, dynamic routing required to serve individual blog posts, the markdown parsing functions, any custom components with mdx, and styling with tailwindcss.
- minimize the time and effort for adding/updating the blog posts
To add a new blog post to the blog, simply drop a new .mdx file into the content directory. And, to update existing blog posts, make the necessary changes directly in the markdown files.
File Structure
My blog lives under the /blog route on my personal site, which is a next.js application. Below is trimmed down look at the files directly associated with the blog functionality.
3 folders, 4 files, plus 1 file for each blog post:
├── /blog  // route for blog landing page
│   ├── /[slug]  // dynamic route for blog posts
│   │   ├── page.tsx // Page Component for blog posts
│   │   └── mdx.tsx // custom MDX components
│   ├── page.tsx // Page Component for blog landing page
│   └── blog.ts // retrieve blog-post.mdx and convert to html
└── /content // directory for storing blog posts
│   └── blog-post.mdx // example blog post file
Closing Thoughts
At first glance, making a blog can appear to be trivial or mundane; and it still might be. But, without having to bear the load of complex technical requirements and deadlines that come with client-work, building this blog deepened my appreciation and understanding of the nuances of my web application that otherwise would go unnoticed. For such a simple application, the tools become increasingly difficult to justify. Writing this blog post forced me to have a clear rationale for each one that I used.
Now, I have my rebuttal to the question, "Why isn’t this just an Express server?"
Much of my inspiration came from the blogs of Lee Robinson and Dan Abramov; both blogs are strikingly clean and efficient. Please check out the source code for mine here. If you have any comments or questions, don't hesitate to reach out. I would love to hear from you.